2. Operation
TerminatorX' user interface is split up into the main controls (master, sequencer, engine controls and menu buttons) and the individual turntable's controls. Each turntable has it's own interface split up into a control and a audio panel (see Section 2.3).
2.1. Menu
To clean-up the user interface a bit further some functions have been moved into a more standard menu bar for the main window (with release 3.80). The following sub-menus are available:
2.1.1. File Menu
The File menu features these functions:
Load Audio File
The "official" position functionality is located at the file button (that reads "NONE" on startup) for each turntable. However, a lot of people expect to find this functionality in the menu, so you can load an audio file from here, too.
New Set
Erases all existing turntables and sequencer events and creates a new and untouched turntable.
Open Set File
Allows restoring of a previously saved terminatorX set file.
Save Set
Saves the current turntables and events in a terminatorX set file.
Save Set As
Like Save but prompts for a new file name.
Quit
2.1.2. Turntables Menu
The Turntables menu features these functions:
Add Turntable
Adds a new turntable to the current set of turntables.
Assign Default MIDI Mappnigs
Will assign the Default MIDI Mappings (see Section 2.9) to all standard parameters. Existing mappings will not be overridden.
Auto Assign Default MIDI Mappings
When this option is enabled will always re-apply the Default MIDI Mappings (see Section 2.9) whenever you load a set, add a new turntable or create a new set. Existing mappings will not be overridden.
Clear MIDI Mappings
Removes all currently assigned MIDI mappings.
Record Audio to Disk
On activation of this option, terminatorX will prompt for a file name for the RIFF/Wave file to create. Once activated terminatorX will start recording audio to disk the next time the audio engine is started - either by pressing the Power or the Play button. Recording will stop when the audio engine is stopped again. The created RIFF/Wave file will be a 16Bit/Stereo wave-file with the sampling rate selected for the current audio backend.
2.1.3. Sequencer Menu
The Sequencer (see Section 2.7 for general information on the sequencer) menu features these functions:
Delete All submenus
These submenus allow you to delete sequencer events of a specific parameter or all events for a complete turntable. After selecting the the parameter/turntable of your choice a dialog will pop-up that allows you to delete all events from either:
the beginning of the song upto the current song position
the current song position upto the end of the song
the beginning to the end of the song (all events)
Delete All Events
Works the same as the Delete All submenus but selects all events for all turntables.
Confirm Recorded Events
Usually terminatorX will add all recorded events of a take to the song event list as soon as you hit the Stop button for the sequencer. If you enable Confirm Recorded Events terminatorX will ask you whether the recorded events should really be fed into the song list. This makes it much easier to record a certain part over and over again until you get it right.
2.1.4. Options Menu
The Options menu features these functions:
Fullscreen
Maximizes the terminatorX main windows to use the complete screen. Note that this requires a NETWM compliant window manager to work. By toggling this option again terminatorX' window can be resized back to the previous state again. The setting will be stored in the ~/.terminatorXrc file.
Preferences
Will pop up the Preferences dialog. For more details on configuration itself see Section 3 .
2.1.5. Help Menu
The Help menu features these functions:
Contents
Starts a gnome-help (aka yelp) process to display the very manual you are reading right now.
About
Selecting this menu item will cause a small dialog to pop up that contains some information on the compile time settings for the terminatorX binary as well as the license.
Visit terminatorX.cx
Will try to spawn a browser process to load the URL http://terminatorX.cx - for easy update checking or just unecessary bloat.
2.2. Main Controls
The controls of the master GUI are located in the top and the right bar of the terminatorX main window.
Audio Engine Power / Mouse Grab
With the Audio Engine Button you can en- and disable the audio playback engine without activating the sequencer. Unlike earlier versions you will not automatically enter mouse-grab mode so you can modify volume/pitch/echo settings etc. while you actually hear what you do.
Some functions are not available when the audio engine is on, their controls will be marked insensitive when you enable the engine. To actually enter grab mode you'll have to click on the "Mouse Grab" button. See Section 2.5 to find out how to control the software then.
Sequencer Play / Record / Stop
Please read Section 2.7 to find out more about the sequencer.
Master Volume / Pitch
The volume and pitch settings of the individual turntables are relative to these master settings. This information will be stored within the .tX set files.
2.3. Turntable Controls
The turntable GUI contains multiple controls and the real time displays for each turntable. To save some space on your desktop and to give terminatorX the traditional audio-application look, terminatorX features "knob"-widgets. These widgets work pretty straight-forward: click somewhere within the widget and keep the left mouse-button pressed. Now move the mouse up and down or left and right to increase/decrease the control's value. All those widget are coupled with a text entry field since 3.70, which allows you to enter values directly.
A turntable is visualized by two panels: the control and the audio panel. These are no longer combined for better layout management.
Sometimes you might find a certain audio or control panel unnecessary - simply eating up space. Since release 3.73 it is possible to minimize audio and control panels to the panel bar with the tiny button with a blue bar icon in the upper right edge of each panel. This bar works just like GNOME's window list or KDE's kicker: When a panel is minimized a button in the bar will appear, representing the minimized window. On clicking this button the button will be removed and the minimized panel is displayed again. When no panels are minimized the panel bar automatically disappears to save display space.
2.3.1. Turntable Audio Panel
The complete audio-file loaded into a turntable is displayed in the green-on-black audio-widget. When playing terminatorX will indicate the current position within the sample with a red cursor (a blue/green cursor indicates the turntable is muted).
Additionally there are some controls above the audio-display:
Turntable Label
This label indicates the turntables name. The name can be set via the control panel
File Button
This button holds the name of the audio-file currently loaded. When there's no sample loaded the button will read "NONE" to indicate the current status. Click on this button to get a menu from which you can load/reload a sound file or run an external soundfile editor. Alternatively you can drag'n'drop files over the audio-display to load them.
The File Button Menu
Load File
Choose this menu entry to select a soundfile from the file-selection dialog that will pop-up.
Reload File
Choose this menu entry to re-read the audio-file.
Edit File
This menu entry will run the external audiofile-editor (that can be specified via the options-dialog) with the current audio-file as a parameter. Choose reload after editing and saving the file.
Mouse Mapping
terminatorX allows mapping misc parameters to the mouse axis of your choice. These mappings will be activated in grab mode, so if you move your mouse in X or Y direction in grab mode the parameters you selected from this menu will be affected (for this turntable). Since Version 3.70 this mappings are no longer hardcoded to built-in controls but available for all parameters that qualify as "mappable". Note that this includes plugins' controls as well.
MIDI Mapping
This button is available only if terminatorX was built with ALSA MIDI support and the sequencer input port was created successfully on startup. For more information on terminatorX' MIDI interface see Section 2.9 .
2.3.2. Turntable Controls
These controls are now grouped within functional panels. The number of panels depends on the number of plugins loaded. terminatorX allows hiding the controls not required via the yellow triangle button. To un-hide just click the button again. The first panels are the standard controls for a turntable, then follows the dynamic FX-section and below that follow the pitch and volume controls.
2.3.2.1. Main Panel
Name Field
The main panel features a text entry field that allows setting a name for the related turntable. The Labels for the controls and the audio-display will update accordingly.
Delete Button
Pressing this button remove the turntable from the current setup. Note that all sequencer events recorded for this turntable will be erased, too.
Pitch Adj. Button
Using two (or more) loops and terminatorX' synchronization facility usually requires adjusting the pitch of the loops so that the turntables play in sync. For precisely cut loops this usually means making them run equally fast or one running twice as fast as the other etc. Manually finding the necessary pitch values usually consumes a significant amount of time so the feature Pitch Adjust helps speeding up this process.
Clicking this button will cause the Compute Pitch dialog to pop up. With this dialog it is possible to specify how many loops of this turntable should be played as fast as a certain amount of loops of the master turntable. After pressing the Ok button terminatorX will adjust the turntable's ptich accordingly in order to match the given playback speed requirements.
Note that this feature is proabably useless when loading complete songs into terminatorX - it's intended for use with precisely cut loops.
2.3.2.2. Playback Panel
The playback panel holds all controls related to triggering the turntable. For more details on synchronization see Section 2.4.
Trigger! Button
Pressing this button triggers the turntable now. With the audio engine enabled this will cause the turntable to start playing back audio from the beginning of the sample.
Stop Button
Guess what, this stops this turntable's audio-playback.
Master Button
Enabling this button makes this turntable the sync-master. Note that only one turntable at a time can be the sync-master.
Client Button
This button marks the turntable as sync-client, so it will be triggered with the master automatically.
Sync-Cycles Selection
The sync cycles determine how often a sync-client should be triggered. With a setting of zero the sync-client will be (re-)triggered with every trigger of the sync-master. A setting of 1 will (re-)trigger the client every second master-trigger and so on.
Below the effect queue a turntable shows some more controls:
Pitch Control
The pitch control allows setting the default playback speed for that turntable (the "motor" speed). Negative values will result in the sample being played backwards.
PAN Control
This parameter allows setting the position of the turntable's main signal within the stereo panorama.
VU Meter
The displayed signal shows the turntable's current signal not including the echo-signal which is mixed separately.
2.3.3. Parameter Menu
TerminatorX can record events for nearly all parameters of a turntable. All of these so-called "sequencable" parameters have an extra pop-up menu since Version 3.81. Simply right-click on the knob, button, slider of the parameter you want to setup, and a menu with the following options will appear:
MIDI Learn
This options provides an easy method to select the MIDI control to modify the parameter you select. If you choose this menu entry, a tiny dialog box will pop up that reads "Waiting for MIDI Event...". The first MIDI event terminatorX receives will now be mapped to control this parameter.
Remove MIDI Binding
If a MIDI event has been bound to a parameter it can be removed by selecting this menu entry.
Map MIDI Reverse
This option can be turned either on or off: when enabled the maximum value of the MIDI controller will be mapped to the minimum value of the controlled parameter and the other way round.
Note that this allows mapping a MIDI controller as a crossfader: simply map the same MIDI controller to two different turntables's volume controls (or optionally extra amplifier plugins) and reverse one of these MIDI mappings.
Set Upper MIDI Bound
Sometimes it is preferable to modify a certain parameter only within a specific value range - this can be achieved with this option - by setting an upper and a lower bound for the MIDI control of this parameter. When you select this menu entry, the current setting of this parameter will be used as the upper bound for the parameter's MIDI mapping.
Reset Upper MIDI Bound
If an upper MIDI bound was set for this parameter it can be removed by selecting this menu entry.
Set Lower MIDI Bound
Works just like setting the uper MIDI bound: when you select this menu entry, the current setting of this parameter will be used as the lower bound for the parameter's MIDI mapping.
Reset Lower MIDI Bound
If a lower MIDI bound was set for this parameter it can be removed by selecting this menu entry.
Delete Sequencer Events
Just like the Sequencer menu (see Section 2.1.3) this entry allows you to delete events recorded for this specific parameter.
2.3.4. The Effect Queue
With release 3.70 the effects are no longer hardcoded into the turntable. The effects are now arranged within an per-turntable effect-queue. Additionally Version 3.82 introduces a second effect-queue that follows the first: the queue for stereo LADSPA plugin effects. The effect sequence is configurable by the user. To move an effect to higher position within the queue, press the blue upward arrow button. This will cause the effect to be rendered before the following effects. The blue downward arrow button will move the effect down by one position. It will then be rendered after the preceding effects.
There are two types of effects: the traditional built-in effects (Lowpass and Echo) and LADSPA plugins. The built-in effects are always available and cannot be removed (but disabled). There can be only one instance of a built-in effect. The LADSPA plugins on the other hand may be instantiated multiple times and can be removed from the effect queue. Press the blue cross button to achieve this.
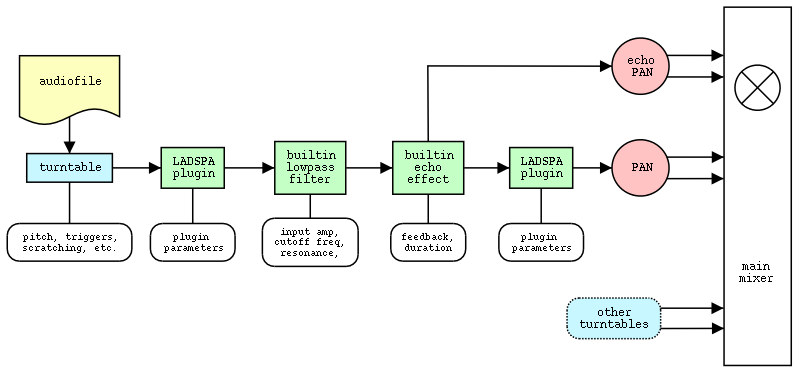
Now since release 3.71 the built-in echo effect is treated differently from other effects. Where all other effects feed their signal back into the effect queue the echo effect doesn't touch the input signal. It's echo-signal is mixed separately from the turntable's main signal to allow a different panning value for the echo-signal. This mode of operation does have some side-effects: imagine a lowpass filter with a position after the echo effect in the effect queue. This will result in the turntable's main signal being lowpass-filtered but it will leave the echo-signal lowpass-unfiltered.
Some may call this behaviour a bug - whereas I would consider it a feature ;). Anyway if the above description didn't clear things up maybe the displayed figure does. It shows a schematic effect queue with the built-in effects and two LADSPA effects enabled. Now with this setup you will not hear anything from the second LADSPA effect in the echo-signal.
Release 3.82 introduces a menu for each LADSPA plugin. Simply click on the Plugin's label to operate the menu. Aside of displaying detailed information about a plugin, the menu also contains some new functionality: Add Dry/Wet Control. When activated the effect receives an extra Dry/Wet control that allows you to modify to what extent the effect will actually effect the turntable's signal. The extra control doesn't differ from the other controls: you can record events for it, etc. The additional control can be removed via the very same menu item that adds the control.
FX and Stereo FX Buttons
Press this button to load a LADSPA plugin into the effect queue of the turntable. A menu holding the available (terminatorX-"compatible") LADSPA-plugins will pop up - mono plugins are available from the FX menu, stereo plugins from the Stereo FX menu. The plugins are grouped within submenus according to the modules the plugins are contained in. Simply select the plugin you want to load from this menu and a panel for it will pop up at the end of the effect queue.
Note that due to the wide parameter ranges some LADSPA plugins have they sometimes might be hard to control with the knob widget. In these cases you might want to use the text field to enter values. For more details on plugins see Section 2.8.
2.3.5. Lowpass Panel
terminatorX features a built-in resonating lowpass filter that can be configured with this panel.
Enable Button
Activating this button will enable the lowpass filter for this turntable.
Input Gain Control
With this parameter you can amplify the signal that goes into the lowpass filter if required.
Frequency Control
Use this parameter to set the cutoff frequency for the lowpass filter. Minimum: 0=0Hz, Maximum: 1=22KHz.
Resonance
Use this parameter to set the resonance-value. Minimum: 0=no resonance, Maximum: 1=max resonance.
2.3.6. Echo Panel
Additionally terminatorX features a built-in echo effect. It can be configured with this panel.
Enable Button
Activating this button will enable the echo effect for this turntable.
Duration Control
Use this parameter to set the length of the echo. The duration parameter scales to the actual sample length: so if you set it to 0.5 you will hear the echo when the red playback cursor is half way through the sample. This is true for samples that are shorter than terminatorX' maximum echo buffer size only.
Feedback Control
Set the echo's feedback amount with this parameter.
Volume Control
This parameter can additionally amplify the echo signal. Unlike the feedback parameter above this parameter has no influence on the signal fed back into the echo-buffer, it effects merely the playback volume of the echo signal.
Pan Control
The echo effect differs from other effects as it's output signal will be mixed separately. The main goal here is to allow positioning the echo signal at a position in the stereo panorama that differs from the main panning position of the turntable to achieve a somewhat spacial effect. The easy example is: turntable's panning left, echo's panning right. As both pan parameters are sequenceable you can create nice motion effects from this starting point.
2.4. Synchronization
Let's start off with an example: Say you have two drum loops and one bassline loaded in three turntables. Of course you want these samples to be triggered at the same time but you don't want to invest time to cut them to the exact length. Therefore you decide which of the drum loops to make the sync master. You'll have to do this before you enable the audio engine (for now). Only one turntable can be the sync master. Now you can make the other two sync clients which will cause them to be (re-)triggered whenever the master is (re-)triggered. The number you can select to the right of the client button sets the trigger delay for the button: if it's set to zero the turntable will be triggered with every master trigger, if it's set to 1 it'll be triggered every 2nd master trigger and so on.
A nice side effect of this feature is: you can now scratch the second (sync client) drum loop and no matter whether you're scratching is good or not the beat will be triggered correctly again ;)
2.5. Grab Mode Operation
After pressing the Mouse Grab button terminatorX enters "grab mode". This mode actually blocks the mouse (as its input is now used to control the real time parameters) and therefore you'll have to know some mouse/keyboard shortcuts to control the software without the GUI.
Press ESCAPE to quit grab mode.
Select the turntable with input focus: The first turntable to hold the input focus will be the first turntable. You can now use TAB or right mouse button to switch to the next turntable. Alternatively you can use F1 to F12 to select turntable 1 to 12.
Now the turntable that has the focus is the one you will manipulate with your mouse and keyboard inputs: Note that you can actually map different functions to the mouse x/y axis - so what actually happens when you move your mouse depends on what you select via the Mouse Mapping for each turntable.
Table 1. Keyboard Controls in Grab Mode
| Key | Function |
|---|---|
| TAB | select next turntable |
| F1 to F12 | select turntable 1 to 12 |
| RETURN | triggers the turntable |
| BACKSPACE | stops the turntable |
| S | toggles "Sync Client" |
| SPACE | while pressed turntable speed is mapped to mouse speed (scratching!) |
| ALT | mute on/off |
| CTRL | mute on/off (inverted) |
| F | ("fast") warp mode (while scratching) |
| W | same as above but the audio will be muted while warping |
Table 2. Mouse Button Controls in Grab Mode
| Mouse Button | Function |
|---|---|
| Left button | same as SPACE: scratching (triggers the turntable when stopped) |
| Right button | select next turntable |
| Middle button | mute on/off |
Scratching works as before: press SPACE or left mouse button to actually scratch: now your mouse controls the turntables speed. Release it to let that turntable spin at default speed again.
2.6. Drag And Drop
Since V3.55 terminatorX provides multiple DND-Drop-Targets for use with GNOME / gmc (gmc is the GNU Midnight Commander), Nautilus or the Enlightenment File Manager (efm). You can load an audiofile into an existing turntable by dragging it from a gmc (or efm or whatever)-window and drop it over a. the file button (audio-display) or b. (the easier target ;) over the audio-display (the green on black widget that displays the audiodata).
To add a file to the set (== to load the file into a *new* turntable) simply drop the audiofile over the "New Turntable" Button. To load a complete terminatorX-set simply drop the set file (*.tX) over the "Load Set" button.
2.7. The Sequencer
Release 3.60 introduced the sequencer. It can record and play back events for the following parameters:
master volume & pitch
scratching
(turntable) volume & pitch
triggers
loop (on/off)
sync client settings
muting
all parameters for the effects. This includes built-in effects (lowpass and echo) as well as LADSPA plugins.
To record events simply press the Record button of the sequencer, then press the Play button. All actions (for sequenceable parameters - see above) you now take will be recorded into the song list. Press Stop and Play again to see/hear how terminatorX plays back the events recorded before. You can now record events again for e.g. another turntable or record other parameters for the same turntable - whatever you want to do. Recording events for parameters for which events have been recorded before will result in dubbing: if you touch a parameter while recording, events previously recorded will be erased from the moment you touch the parameter until you stop recording.
When recording long sequences/songs you can use the sequencer-scale to start recording/playback from any song-position you want. To record a single parameter value at a certain position simply move the sequencer-scale to that position, press Record, set the parameter and press Stop again.
To selectively delete events from the sequencer see Section 2.1.3 and Section 2.3.3.
2.8. Plugins (LADSPA)
Since release 3.70 terminatorX supports LADSPA-plugins. LADSPA is the "Linux Audio Developer's Simple Plugin API" which was designed by developers on the Linux-Audio-Developer-Mailinglist and is maintained by Richard W.E. Furse. For more information on LADSPA, other LADSPA-hosts and LADSPA-plugins checkout the LADSPA homepage.
Not every plugin is supported by terminatorX though. As the plugins are inserted into the per-turntable effect-queue, they have to be mono or (as of Version 3.82) stereo plugins. This is why terminatorX will load plugins with one or two audio-in ports and one or two audio-out ports only.
The decision on whether a plugin is terminatorX-suitable is made on terminatorX startup, so only plugins that fit into the effect queue will be offered in the mono plugin-menu that pops up when the FX button is clicked or in the stereo plugin menu when the Stereo FX button si clicked. Depending on whether the terminatorX binary you're using was built with or without liblrdf ( Section 2.8.1) support the plugin menu will either contain sub-menus with plugin categories (with liblrdf) or just a single menu with the Unclassified category.
On startup terminatorX will print some information on the LADSPA-plugins analysis process to the standard output if you have enabled "Verbose Plugin Loading" in the Preferences dialog. Watch the terminal you run terminatorX from for that info if you have problems loading a plugin.
As specified in the LADSPA-standard LADSPA-plugins can be located in multiple directories across the filesystem. To enable LADSPA-hosts to find those plugins you have to set the environment variable LADSPA_PATH accordingly. Let's say you store your plugins in /usr/lib/ladspa and /home/yourlogin/plugins then you would have to set:
LADSPA_PATH= /usr/lib/ladspa:/home/yourlogin/plugins
As a fallback terminatorX will look in the standard directories /usr/lib/ladspa and /usr/local/lib/ladspa if the environment variable is not set. Note that this is just a convenience-function, in order for other LADSPA-hosts to work properly, be sure to set your LADSPA_PATH correctly. It is a good idea to do that from somewhere in your system configuration (either in your rc-scripts or /etc/profile or wherever you prefer).
2.8.1. liblrdf support
Release 3.80 introduces support for Steve Harris' great liblrdf library which introduces an RDF based scheme to categorize LADSPA plugins. This approach allows storing additional meta-data for LADSPA plugins in separate RDF files. In order to make use of these RDF files a terminatorX binary (compiled with liblrdf support of course) requires the main ladspa.rdfs file and additional RDF files containing meta information about the LADSPA plugins installed. Steve Harris' wonderful plugin library comes with such an additional description file for example.
By default terminatorX will search the directories /usr/share/ladspa/rdf and /usr/local/share/ladspa/rdf for RDF files. In case the files were installed to other locations it is possible to configure the LADSPA RDF path in the Misc tab of the Preferences dialog.
If the RDF are read successfully on startup, the LADSPA menu that pops up when clicking a turntable's FX button will feature multiple sub-menus with LADSPA plugin categories (eg Amplitude/Amplifier) in which you will find the according plugins. Plugins not categorized by the RDF files reside in the Unclassified menu.
2.9. MIDI Interface
Aside of controlling terminatorX with a regular mouse and keyboard it is possible to control parameters through MIDI events (since 3.80). The MIDI interface is based upon the ALSA sequencer API. On startup terminatorX creates a MIDI input port called "terminatorX". You can now use for example the alsa-patch-pay to connect an output port of your choice (either a hardware MIDI input device or a software generating midi events) to the terminatorX input port. If the "Restore MIDI Connections" option is activated terminatorX will try to re-connect to the MIDI ports it was connected to with the last run. However this approach is purely address-based and might fail miserably with software ports, in this case just disable the configuration options re-wire manually.
There are two ways to map MIDI events to a parameter:
Via the Configure MIDI Bindings dialog as described below
Via the the a parameter's menu (see Section 2.3.3)
Once the connection is set up terminatorX receives MIDI events through the input port. To configure what MIDI events will have which effect on a terminatorX turntable you can bind MIDI events to parameters of your choice by clicking the MIDI button of the turntable's audio panel. As a result the Configure MIDI Bindings dialog will pop up which features a field labelled Selected MIDI Event that will frequently update to display the contents of the last MIDI event received by terminatorX. So in order to map a MIDI controller to a specific turntable parameter select the parameter of your choice from the parameter list, cause your MIDI event sending device to emit the event you want to map the parameter on and click the Bind button.
Immediately after binding the event you should see that the Event column entry of the selected parameter is updated to match the selected event. From now on all events matching the selected event will cause the turntable parameter to be updated. The GUI for that parameter will be refreshed accordingly. Note that it is possible to map the same event to multiple parameters.
The MIDI mappings are stored within terminatorX set files so you wont have to reconfigure your bindings every time you start up terminatorX. If you are unhappy with a chosen binding you can select the parameter and click the Remove Binding button to get rid of the parameter's MIDI mapping.
TeriminatorX now features a default MIDI mapping that can be enabled via the Turntables Menu (see Section 2.1.2). The controllers are mapped in a one channel per turntable fashion:
Table 3. Default MIDI Controller Mapping
| Turntable Parameter | MIDI Controller | MIDI CC Name |
|---|---|---|
| Volume | 7 | "Main Volume" |
| Pan | 10 | "Pan" |
| Lowpass Cutoff Frequency | 12 | "Effect Control 1" |
| Lowpass Resonance | 13 | "Effect Control 2" |
| Lowpass Gain | 16 | "General Purpose Controller 1" |
| Speed | 17 | "General Purpose Controller 2" |
| Pitch | 18 | "General Purpose Controller 3" |
| Sync Cycles | 19 | "General Purpose Controller 4" |
| Echo Length | 75 | "Sound Controller 6" |
| Echo Feedback | 76 | "Sound Controller 7" |
| Echo Volume | 77 | "Sound Controller 8" |
| Echo Pan | 78 | "Sound Controller 9" |
The toggle parameters of a turntable (where things can only be turned on or off) are mapped to MIDI NOTE events, where the first turntable is mapped to 'C', the next to 'C#', the next to 'D' and so on. The "function" of the toggle is defined via the selected MIDI channel:
Table 4. Default MIDI Note On/Off Mapping
| Turntable Parameter | MIDI Channel |
|---|---|
| Trigger | 0 |
| Sync Client | 1 |
| Loop | 2 |
| Lowpass Enable | 3 |
| Echo Enable | 4 |
| Mute | 5 |
| Motor Spin On/Off | 6 |
If you want to use your joystick to control terminatorX - I wrote a tiny tool to create MIDI events from joystick motion called aseqjoy. It's available from the terminatorX website, too.
2.10. JACK Support
TerminatorX Version 3.81 brings support for the JACK Audio Connection Kit. Instead of writing audio data directly to some audio device terminatorX can send data to the JACK Daemon for further processing.
To use the JACK backend you have to ensure that the JACK Daemon is up and running before you start terminatorX. The JACK backend is only available if terminatorX was capable of connecting to the JACK Daemon on startup. By default the two output ports of terminatorX will be connected to physical ports if available. You can then re-wire the ports whatever way you want. They will not be deactivated - when terminatorX' audio engine is turned off, the audio backend emits continuous silence.